Pot Care Guidelines
Pot and Plant Care Guidelines Now that you have your new Pots we want to offer some guidelines for getting the maximum lifespan out of your pot and help you avoid some common pitfalls when placing materials and plant life inside your Pot. Please follow these tips to circumvent voiding your warranty and contact us if you have any questions.
This is one of the most critical elements which if done incorrectly could void your warranty and damage your Pots and Plants. To allow for drainage our Pots have had drainage holes provided to allow water to flow out of the pot and not get caught which leads to Pot and Plant damage. Please adhere to these guidelines We recommend a single layer of fly screen secured over the drainage holes. This keeps the holes from blocking with stones, soil or other debris and allows finer materials to drain through including water. Please do not use weed mat, filter/geo fabric or silt mesh to achieve this as it will cause the soil to become water logged causing pot and plant damage. We also recommend additionally adding a 50mm layer of 10mm blue metal available at hardware stores We recommend a quality potting mix to make sure there is sufficient drainage. Please do not use normal garden soil as damage will occur to the plants and pots. Once your new pot is in position it is important to elevate your Pots to ensure the drainage holes aren’t blocked. This can be achieved by purchasing our quarter pie feet to all ow space for water to drain otherwise pooling can occur.
To give your plants the best start to life we recommend mixing in a slow release fertiliser in your quality potting mix before planting up. We recommend an all – purpose fertiliser. After planting we recommend using a liquid – based fertiliser every 3 – 5 weeks.
If your plant arrives in a nursery supplied container we recommend carefully squeezing the base of the container to help ease the plant out but if it doesn’t rele ase the plant you can always cut the plastic nursery container to remove the plant being careful not to cut the plant. When planting conditions are ready please make sure the plant is planted at the same position as the provided nursery pot, which ensures that the plant stem is not covered. It’s a great idea to water the pot after planting to position the soil correctly. In some cases you may need to add to your soil after watering.
Plant Maintenance The amount of water provided to plants is crucial in providing a long life to your plants. A nice moist soil vs a heavy wet soil is preferred by most plants. Simply scrape the top layer of soil and if dry underneath then a top up may be required. After wat ering ensure that you apply enough water to reach the roots.
Blocked Drainage Holes
• Use of Sand, Foam, Garden Soil, Cement , Filter/Geo Fabric, Silt Mesh and other materials that can block drainage holes causing water pooling to occur. Pots are not intended to be pools which can cause damage as shown below and is NOT covered by warranty
• Lack of elevation of the Pot through no use of quarter pie feet or adequate lift for drainage is NOT covered by warranty.
Efflorescence
• Efflorescence is most commonly thought to be caused by the Calcium Hydroxide (lime) in the cement. When this evaporates to the surface of products it reacts with carbon dioxide in the air to cause the Efflorescence. Apart from lime it is thought that Efflorescence can also be caused by other minerals and salts in any of the cement, sand, aggregates and water that are used in manufacturing of concrete products.
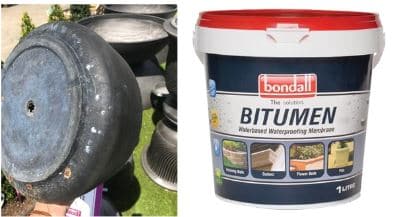
• To reduce the likelihood of Efflorescence from occurring we recommend all products have a water based bitumen sealer applied on the inside of the pot for added protection • Pots will not be replaced or refunded for warranty purposed based on this naturally occurring process
• Damage occurring from rough handling of t he Pots will void your warranty
The following information is from the Bondall manufacturer on the correct application of bitumen sealer
- Tack Free drying time in 60-90 mins
- Recoat: 2-4hrs
- Dry Film: 24hrs
- Backfilling soil: 4 days
- Immersed Areas: 21 days
- Recommended 2 coats applied at different directions
- Based at an ambient temp of 20c

